

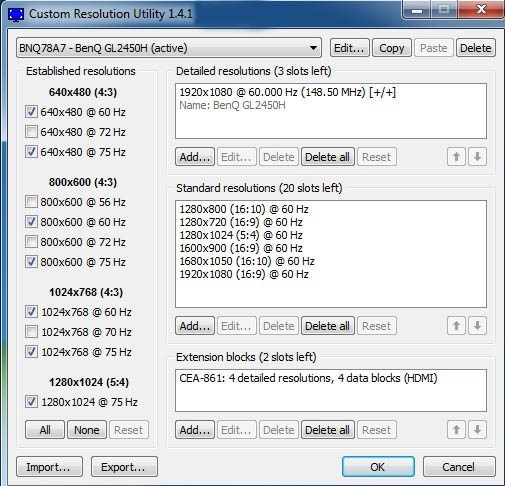
The source device uses EDID data to find one of the best methods to output video and audio and ensure overall compatibility and optimal display quality when you connect a device to a display. Custom Resolution Utility is an EDID editor and designed to focus on custom resolutions. It shows users how the monitor defines resolutions and other capabilities. It also gives users the power to alter it.
All users of the Custom Resolution Utility can add custom resolutions, edit FreeSync ranges, remove unwanted resolutions, and other things. This tool creates software EDID overrides in the registry. It does not change the hardware. This versatile and powerful tool supports a lot for improving the computing experience by allowing the creation of custom display resolutions.
The main attractions of the Custom Resolution Utility
The Custom Resolution Utility is known for its user-friendly interface. Every user of this tool feels comfortable every time they use it. You can simply download and install the utility from a reliable platform to create a custom resolution. Once you have launched this tool, you can input the desired resolution and refresh rate. Remember that the values you input are supported by both graphics cards and monitors to avoid any issue associated with the compatibility.
The Custom Resolution Utility is a small and freeware utility. It does not need installation. It is a portable solution for on-the-go adjustments. You can run this tool directly from any storage device. This tool offers flexibility and convenience for its users who need display customization across different systems.
The CRU simplifies the process of defining custom resolutions by creating EDID overrides directly in the registry and properly bypassing the requirement for the file manipulations. This tool is capable of adding new monitor resolutions which can be scaled up from the low resolutions. It gives a range of options for optimizing the display settings as expected by users.
What are the important features of Custom Resolution Utility?
- Custom Resolution Settings: Users of this tool can easily adjust resolutions beyond standard limitations.
- Detailed Color Adjustments: You can improve the color depth and range for vivid visuals.
- Multi-monitor support: You can configure settings for multiple displays easily.
- Refresh Rate Optimization: You can fine-tune refresh rates for smooth gameplay.
- User-friendly interface: The intuitive design of this tool is important for seamless navigation and adjustments.
The driver of AMD/ATI listens to the TMDS clock limit in the HDMI support data block. The HDMI limits are based on the graphics card. It is treated as a single-link DVI unless an HDMI support data block is defined in the first extension block. The overall limit of the HDMI is based on the graphics card. You have to know and remember that passive DisplayPort to HDMI adapters are usually limited to 165 MHz unless the driver is patched.
The complete requirements for using the Custom Resolution Utility
Windows Vista or later versions of Windows computers are needed to use this tool. However, Windows XP does not support EDID overrides. You need an AMD/ATI or NVIDIA GPU with an appropriate driver installed in your system to use this utility. Users of Intel GPUs and laptops with switchable graphics are supported with suitable drivers.
You can use new Intel GPUs as they support the latest drivers. If you use the Windows computer, then you can use the 4th generation Haswell, 4th/5th generation (Haswell/Broadwell), 6th generation (Skylate) with Intel graphics driver. Outdated Intel GPUs are supported for all external displays using the alternative method.
All beginners to the Custom Resolution Utility have to familiarize several things before making any changes. For example, you have to get into safe mode while using a recovery drive when you cannot see the screen. You can press and hold the power button to shut off your system while Windows is booting when you do not have a recovery drive. You can get the best recovery options by doing it twice. You can use the options as Troubleshoot > Advanced options > Startup Settings > Restart.
Do you like to experience absolute control over your display settings? You are at the right place. You can pick and use the Custom Resolution Utility hereafter. This tool offers seamless customization of screen resolutions and ensures optimal display performance. This tool is tested and regularly updated to maintain compatibility with the modern hardware and operating system.
Customize the resolution on time
Once you have started using this tool, you can unlock modern features and enhance your visual experiences further. You have to run CRU.exe to use this tool. You can select a display from the drop-down list. You can customize the configuration as per needs and repeat the same step for other displays when needed. If you have done all such things, click “OK” to save changes. You can run restart.exe to restart the graphics driver. At last, set the resolution in Windows display settings.
You may also find this useful


Comments
SonicVaio-453
Brandon George
Slot Gacor
Brandon George
SungCun
Brandon George
Brandon George