

Polaris BIOS Editor is a program for changing timings and other operating parameters of video cards based on the Polaris architecture. The tool is compatible with almost 99% of video cards with this architecture. In particular, it is an excellent option for RX4x0 and RX5x0 video adapters, with 2-8 GB of memory, as well as 16 GB.
How to use the Polaris BIOS Editor?
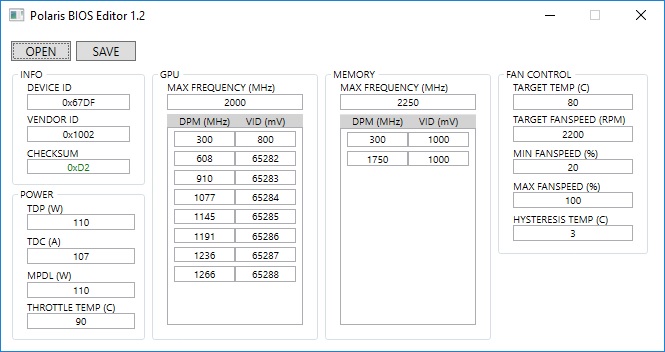
You may wish to efficiently use the Polaris BIOS Editor. You have to download and unpack this program first. The next step is to run the file. You have to click the Open BIOS option located in the upper left corner of the computer.
Now, the firmware opens for reflecting the timings. You have to configure the parameters after opening the firmware. The first step is to press the One-click timing patch, where timings are automatically edited. The second step is to press Save as, where the firmware has been saved.
All users of personal computers can confidently download this tool from the official source and use it as per professional guidelines for the best result. The target temperature in this tool is the temperature regime and is regulated by maximizing the cooler power or reducing its overall frequencies.
The power control limit is used in different cases where there is no option to apply an afterburner. You can concentrate on important aspects of this identical power limit, in which you have to work on the same principle. You can turn on the fan by using the settings in the column, namely fan. You have to make essential changes to the min PWM when the fan does not work at all during downtime. You can do it by changing the indicators to positive.
Significant features of the Polaris BIOS Editor
Attractive things associated with this GPU BIOS modification tool encourage many users of personal computers to choose and use it for editing the BIOS settings in the AMD Polaris GPU. If your computer uses the Polaris architecture, then you can choose and use this tool as per the guidelines. You need administrator privileges, .NET Framework 4.5 or higher, and Windows 7, 8, or 10 to use this tool.
- Key functions: BIOS reading, BIOS saving, BIOS modification, timing straps editing, and voltage curve adjustment.
- Key features: Memory strap editing, fan speed control, power limit adjustments, and voltage table modifications.
- Safety features: Parameter validation, backup creation, and checksum verification.
- The main modification: Includes Memory timings optimization, voltage reduction, power limit adjustment, and fan curve customization.
- Safety precautions: Monitor temperatures, test settings gradually, always back up the original BIOS, and ensure proper cooling.
In general, GPUS are made with suitable performance constraints. Video card developers understand it and protect the overall batch from collapse. They ensure that video cards have the best stuff to operate at high frequencies. You can use this tool to make a GPU modification without delay and difficulty.
All users of complex applications like mining and high-demand games require positive changes to the parameters of their GPUs. They recommend this tool to others as it is compatible with almost 99% of video cards. This tool is suitable for both video adapters, namely RX4x0 and RX5x0. You can use this tool and video cards with 16GB or two 8GB memories.
Comments
3wimaroibah
Leonard
Twila
Jess
CelestaW
Wilda
MaricelaX
Brandon George
BeaR
ShaunteR