

AFUWIN is a Windows-based utility designed to flash or update the BIOS of a computer. The full name of this tool is American Firmware Update Utility for Windows. It is designed to let its users update the BIOS firmware while successfully running Windows. It is particularly for motherboards from top manufacturers like ASRock.It can be useful in different situations, especially where you might need to downgrade a particular BIOS version or downgrade it.
How to use AFUWIN Flash Utility
As a user of a Windows 7 computer, you can successfully use this utility and flash BIOS on your computer. You have to go to Control Pane and disable (UAC). The next step is to reboot the system. If you have done it, then you have to go to the control panel and turn off or uncheck (UAC) as shown below.
It is the right time to click “Reboot” and copy the “AFUWIN” folder to the Windows desktop. The next step is to choose and execute the command “AFUWIN.exe” and click the option “OK”.
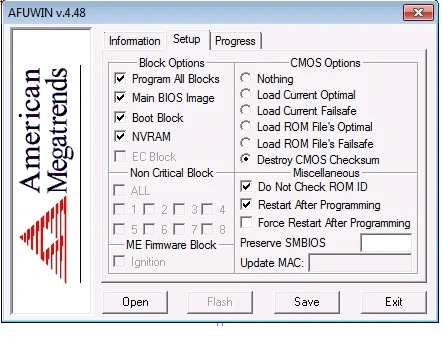
The next step is to click “Open” and download the BIOS file namely “.ROM”. Now, the default screen of the AFUWIN flash utility appears. You have to choose “Program all units” and uncheck “Restart after programming”. The next step is to click “Flash” and then click “Exit” to reboot the system.
A specialized utility
AFUWIN is an outstanding utility developed by ASRock for successfully updating BIOS firmware on ASRock motherboards. New and regular users of this Windows-based app get 100% satisfaction. This is because of a safe and simple method to flash the BIOS of their motherboards.
There is a user-friendly interface in this program. This interface guides every user through the BIOS update process step by step. This successful tool is designed to reduce the risk of errors during the BIOS updates. It is important as incorrect BIOS flashing can potentially damage the motherboard.
Key features
Attention-grabbing features make the AFUWIN very popular worldwide today. Some of these features are as follows.
- Ability to save current BIOS settings.
- Built-in safety checks to prevent incompatible BIOS installations.
- Compatibility with different ASRock motherboard models.
- User-friendly graphical interface.
- Progress monitoring.
- Backup functionality.
- Recovery options.
- Automatic firmware verification.
- Command-line interface support.
- Error reporting.
You may think about what to do for a successful BIOS update with this tool. You have to download this tool from the official websites and carefully follow the complete instructions. Remember that this program is only compatible with particular motherboards and appropriate BIOS files.
Safety features of the AFUWIN
Safety is the main thing considered by all users of computers today. If you are very conscious about the safety in all aspects, then you can choose and use the AFUWIN hereafter. This utility has the following safety features.
- Power loss protection.
- Recovery mode.
- Backup creation.
- Checksum verification.
- Firmware validation.
The most important functions
Have you decided to know and remember the significant functions of AFUWIN utility? You can focus on the following details.
- BIOS backup.
- BIOS/UEFI firmware updates.
- Firmware verification.
- ROM file flashing.
- System information display.
Platforms supported by AFUWIN utility
- Windows XP.
- Windows Vista.
- Windows 7.
- Windows 8/8.1.
- Windows 10.
- Windows 11.
System requirement for using the AFUWIN
You require the Windows operating system, administrator privileges, compatible motherboard, stable power supply, minimum 64MB RAM, and Internet connection for updates. If you get all these things, then you can start using the AFUWIN as per guidelines.
The main advantages for users of the AFUWIN
- Professional support.
- Built-in safety features.
- Secure update process.
- Reliable.
- User-friendly nature.
The most important usage scenarios of the AFUWIN
- BIOS updates.
- Firmware upgrades.
- Recovery operations.
- System maintenance.
- Troubleshooting.
Things to do to successfully use the AFUWIN
Once you have decided to successfully use the user-friendly yet modern AFUWIN utility, you have to create backup before updating. You must ensure stable power supply and verify firmware compatibility. You have to follow manufacturer guidelines and do not interrupt update process.
What are all the main resources supported by the AFUWIN?
- Online Documentation.
- FAQ section.
- Troubleshooting guidelines.
- User forums.
- Technical support.
Security considerations associated with AFUWIN
- Anti-tampering measures.
- Firmware source verification.
- System integrity checks.
- Secure boot support.
- Update authentication.
Conclusion
AFUWIN is an excellent utility designed to update the BIOS/UEFI firmware, display system information, verify firmware, backup BIOS, and flash ROM files. This user-friendly tool has lots of outstanding features to give remarkable benefits to every user.
You may also find this useful


Comments
canadianCerber
Brandon George
GraliontoriZMO
Leonardios